"LB + Web x 2 + RDB"マルチAZ”でWordPressをインストールするCloudFormation
はじめに
前にAWSさんの体験ハンズオンで経験した"LB + Web x 2 + DB x 2"環境構築して、そこに動作確認としてWordPressをインストールして動かすところまでの手順を、CloudFormationを使って自動化して見ました。WordPressのインストールは、CloudFormationのcfn-init ヘルパースクリプトを使っています。
構成概要

CloudFormationコード
SRPM展開&Gun global解析&squashfs化する自作ツールの説明
1.ツールができること
"srpm2html.py"は、SRPMソースコードを展開、Gnu global処理、その他諸々を自動化する自作ツールです。
具体的には、このツールを使うと以下の一連の作業をサボることができます。
- SRPMパッケージを所定のウェブサイトからダウンロードして
- SRPMをインストールして
- SRPMからソースコードを展開(rpmbuild -bpコマンド実行)して
- Gnu globalでコードをタギング解析してhtml化して
- globalで作成したhtmlファイルと、ソースコードの2つをそれぞれsquashfs化して
- squashfsのマウント先ディレクトリを作成して
- "/etc/fstab"に作成したsquashfsファイルのマウントエントリーを追加して
- squashfsをマウントしてくれる
コードはgithub(gist)に登録してあります。
- GitHub(gist)登録先: srpm2html.py
- ライセンス:Apache License, Version 2.0
2.インストール方法
2.1 前提環境
Linuxであれば多分動くと思います。(私は、CentOS6,AmazonLinux上で利用しています)
2.2 前提パッケージ
この自作ツールを実行するためには以下のrpmパッケージが必要です。*1*2
sudo yum install rpm-build squashfs-tools gcc make ncurses-devel
2.3 Gnu Globalのインストール
Gnu globalはソースコードをダウンロードしてmakeします。
wget http://tamacom.com/global/global-6.5.6.tar.gz
tar -xxvf global-6.5.6.tar.gz
cd global-6.5.6
./configure
make
sudo make install
2.4 ツールのセットアップ
srpm2html.pyは、githubに登録してあるのでそこからダウンロードします。
cd "セットアップしたいディレクトリパスを指定"
wget https://gist.githubusercontent.com/Noppy/027ea703dd7084be0c3d4d99ce618109/raw/1e3eefeb83c7542d37c8c455701a0f727df128d4/srpm2html.py
chmod +x srpm2html.py
2.5 ディレクトリの準備
デフォルトでは下記ディレクトリが必要になります。ディレクトリは実行時の引数(後述)または、pythonの先頭のデフォルト設定を書き換えることで変更可能です。
- 必要なディレクトリ
- /tmp : srpmのダウンロードと追加するfstabの作成に使用。容量は利用しない。
- /data/rpmbuild : srpmインストール、コード展開、globl解析をするメイン作業用。
- /data/squshfs : 作成したsquashfsファイルの格納先
- /data/kernel : Globalが生成したhtmlのsquashfs化したもののマウントポイントを作成するディレクトリ(kernelのsrpmを解析した場合)
- /data/tools : 上記と同じ(kernel以外の、srpmを解析した場合)
- /data/source:ソースコードをsquashfs化したもののマウントポイントを作成するディレクトリ
2.6 sudo設定
最後のfstab更新とマウント実行時に、sudoコマンドを利用しています。srpm2html.py実行ユーザがsudoでroot昇格できるように設定を事前にして下さい。またパスワード入力が面倒な方は、NOPASSWDもして下さい。
3.使い方
3.1 簡単な使い方
簡単な使い方は以下のとおりです。
./srpm2html.py "SRPMファイルのURL"
例えば、CentOS7.3のカーネルソースを展開したい場合は以下の通りになります。
srpm2html.py http://vault.centos.org/7.3.1611/os/Source/SPackages/kernel-3.10.0-514.el7.src.rpm
3.2 引数の説明
- 構文
usage: srpm_to_html.py [-h] [-d] [-t TMPDIR] [-r RPMBUILDDIR] [-s SQUASHFSDIR]
                       [-K HTTP_KERNELSDIR] [-T HTTP_TOOLSDIR] [-S SOURCEDIR]
                       SRPM_FilePath_or_URL
- 必須引数
- 主なオプション詳細
- -h, --help : ヘルプの表示
- -t TMPDIR, --tmpdir TMPDIR : tmpディレクトリの指定
- -r RPMBUILDDIR, --rpmbuilddir RPMBUILDDIR : srpmの展開先と作業用ディレクトリの指定
- -s SQUASHFSDIR, --squashfsdir SQUASHFSDIR : squashfsファイルの格納先ディレクトリ指定
- -K HTTP_KERNELSDIR, --http_kernelsdir HTTP_KERNELSDIR : マウントポイントを作成するディレクトリ指定(kernel)
- -T HTTP_TOOLSDIR, --http_toolsdir HTTP_TOOLSDIR : マウントポイントを作成するディレクトリ指定(kernel以外)
- -S SOURCEDIR, --sourcedir SOURCEDIR : マウントポイントを作成するディレクトリ指定(ソースコード)
SRPMインストール先を指定する方法
ソースコードをパッケージ化したSRPM(拡張子がsrc.rpmのファイル)のインストール先は、デフォルトでは"${HOME}/rpmbuild"になります。(CentOS5/RHEL5以前は"/usr/src/redhat")。このデフォルトのインストール先を変更する方法を説明します。
1.普通にSRPMをインストールした場合
$rpm -ivh lsof-4.87-4.el7.src.rpm
デフォルトでインストールした場合は、ホームディレクトリ配下のrpmbuildディレクトリにインストールされます。
/home/n/rpmbuild/
├── SOURCES
│   ├── lsof_4.87-rh.tar.xz
│   └── upstream2downstream.sh
└── SPECS
    └── lsof.spec
2.インストール先ディレクトリを指定する方法
cloudformation VPC(PubSub x 2, PrivateSub x 2) + 1 Instance(t2.micro, AmazonLinux) を作るテンプレート
概要
自分用のメモです。"一つ前の記事"のVPCのPublicASubにインスタンスを一つ追加したテンプレートです。
作成されるもの
- VPC × 1
- サブネット × 4
- PubASub CIDR:10.0.1.0/24, AZ: ap-northeast-1a ルートテーブル: インターネットへのルーティングあり
- PubBSub CIDR:10.0.2.0/24, AZ: ap-northeast-1c ルートテーブル: インターネットへのルーティングあり
- PrivateASub CIDR:10.0.11.0/24, AZ: ap-northeast-1a
- PrivateBSub CIDR:10.0.12.0/24, AZ: ap-northeast-1c
- セキュリティグループ × 2
- インスタンス × 1
※AZは東京の場合
構成概要

テンプレート
cloudformation VPC(2つのパブリックsub+2つのプライベートsub)を作るテンプレート
概要
自分用のメモです。下記のようなvpcを作るテンプレートです。
作成されるもの
- VPC × 1
- サブネット × 4
- PubASub CIDR:10.0.1.0/24, AZ: ap-northeast-1a ルートテーブル: インターネットへのルーティングあり
- PubBSub CIDR:10.0.2.0/24, AZ: ap-northeast-1c ルートテーブル: インターネットへのルーティングあり
- PrivateASub CIDR:10.0.11.0/24, AZ: ap-northeast-1a
- PrivateBSub CIDR:10.0.12.0/24, AZ: ap-northeast-1c
- セキュリティグループ × 2
※AZは東京の場合
構成概要

テンプレート
ubuntuで古いカーネルを削除する方法(/bootの空きが足りない時とか)
1.はじめに
ubuntuで「ソフトウェアの更新」で「/bootのディスク容量が足りない」と言われてしまった時の対処方法です。
ubuntuが結構頻繁にkernelの更新を行うようで、私は半年ぐらい周期で/bootが足りなくなります。

2.対処方法(古いkernelの削除)
(1)現在のカーネルバージョンの確認
$ uname -r
4.4.0-59-generic
(2)インストール済みカーネルのバージョン一覧を確認
現在利用中のカーネルバージョン(4.4.0-59)以外のバージョン(4.4.0-38、4.4.0-45、4.4.0-47、4.4.0-51、の4つ)をこれから削除します。
$ dpkg --get-selections |grep linux-
linux-base					install
linux-cloud-tools-4.4.0-38			install
linux-cloud-tools-4.4.0-38-generic		install
linux-cloud-tools-4.4.0-45			install
linux-cloud-tools-4.4.0-45-generic		install
linux-cloud-tools-4.4.0-47			install
linux-cloud-tools-4.4.0-47-generic		install
linux-cloud-tools-4.4.0-51			install
linux-cloud-tools-4.4.0-51-generic		install
linux-cloud-tools-common			install
linux-cloud-tools-generic			install
linux-firmware					install
linux-generic					install
linux-headers-4.4.0-36				install
linux-headers-4.4.0-36-generic			install
linux-headers-4.4.0-38				install
linux-headers-4.4.0-38-generic			install
linux-headers-4.4.0-45				install
linux-headers-4.4.0-45-generic			install
linux-headers-4.4.0-47				install
linux-headers-4.4.0-47-generic			install
linux-headers-4.4.0-51				install
linux-headers-4.4.0-51-generic			install
linux-headers-4.4.0-59				install
linux-headers-4.4.0-59-generic			install
linux-headers-generic				install
linux-image-4.4.0-36-generic			install
linux-image-4.4.0-38-generic			install
linux-image-4.4.0-45-generic			install
linux-image-4.4.0-47-generic			install
linux-image-4.4.0-51-generic			install
linux-image-4.4.0-59-generic			install
linux-image-extra-4.4.0-36-generic		install
linux-image-extra-4.4.0-38-generic		install
linux-image-extra-4.4.0-45-generic		install
linux-image-extra-4.4.0-47-generic		install
linux-image-extra-4.4.0-51-generic		install
linux-image-extra-4.4.0-59-generic		install
以下略
(3)コマンドをテスト実行確認(DryーRun)
apt-getコマンドで古いカーネルパッケージを削除します。
”--purge”オプションで削除するパッケージを指定しますが、指定が正しいか確認するため”--dry-run”オプションで空実行させて確認します。
$ sudo apt-get --dry-run autoremove --purge linux-{headers,image}-4.4.0-{36,38,45,47,51}
パッケージリストを読み込んでいます... 完了
依存関係ツリーを作成しています
状態情報を読み取っています... 完了
<省略>
アップグレード: 0 個、新規インストール: 0 個、削除: 39 個、保留: 234 個。
Purg linux-cloud-tools-4.4.0-38-generic [4.4.0-38.57]
Purg linux-cloud-tools-4.4.0-38 [4.4.0-38.57]
Purg linux-cloud-tools-4.4.0-45-generic [4.4.0-45.66]
Purg linux-cloud-tools-4.4.0-45 [4.4.0-45.66]
Purg linux-cloud-tools-4.4.0-47-generic [4.4.0-47.68]
Purg linux-cloud-tools-4.4.0-47 [4.4.0-47.68]
Purg linux-headers-4.4.0-36-generic [4.4.0-36.55]
Purg linux-headers-4.4.0-36 [4.4.0-36.55]
Purg linux-headers-4.4.0-38-generic [4.4.0-38.57]
Purg linux-headers-4.4.0-38 [4.4.0-38.57]
Purg linux-headers-4.4.0-45-generic [4.4.0-45.66]
Purg linux-headers-4.4.0-45 [4.4.0-45.66]
Purg linux-headers-4.4.0-47-generic [4.4.0-47.68]
Purg linux-headers-4.4.0-47 [4.4.0-47.68]
Purg linux-headers-4.4.0-51-generic [4.4.0-51.72]
Purg linux-headers-4.4.0-51 [4.4.0-51.72]
Purg linux-signed-image-4.4.0-36-generic [4.4.0-36.55]
Purg linux-image-extra-4.4.0-36-generic [4.4.0-36.55]
Purg linux-image-4.4.0-36-generic [4.4.0-36.55]
Purg linux-signed-image-4.4.0-38-generic [4.4.0-38.57]
Purg linux-image-extra-4.4.0-38-generic [4.4.0-38.57]
Purg linux-image-4.4.0-38-generic [4.4.0-38.57]
Purg linux-signed-image-4.4.0-45-generic [4.4.0-45.66]
Purg linux-image-extra-4.4.0-45-generic [4.4.0-45.66]
Purg linux-image-4.4.0-45-generic [4.4.0-45.66]
Purg linux-signed-image-4.4.0-47-generic [4.4.0-47.68]
Purg linux-image-extra-4.4.0-47-generic [4.4.0-47.68]
Purg linux-image-4.4.0-47-generic [4.4.0-47.68]
Purg linux-signed-image-4.4.0-51-generic [4.4.0-51.72]
Purg linux-image-extra-4.4.0-51-generic [4.4.0-51.72]
Purg linux-image-4.4.0-51-generic [4.4.0-51.72]
Purg linux-tools-4.4.0-36-generic [4.4.0-36.55]
Purg linux-tools-4.4.0-36 [4.4.0-36.55]
Purg linux-tools-4.4.0-38-generic [4.4.0-38.57]
Purg linux-tools-4.4.0-38 [4.4.0-38.57]
Purg linux-tools-4.4.0-45-generic [4.4.0-45.66]
Purg linux-tools-4.4.0-45 [4.4.0-45.66]
Purg linux-tools-4.4.0-47-generic [4.4.0-47.68]
Purg linux-tools-4.4.0-47 [4.4.0-47.68]
4.4.0-36,38,45,47,51の5つのバージョンが選択されていることを確認します。
(4)パッケージを削除する
”--dry-run”オプションを外して削除実行します。
$ sudo apt-get autoremove --purge linux-{headers,image}-4.4.0-{36,38,45,47,51}
(5)削除されたか確認
4.4.0-51以外のバージョンのカーネル削除されたか確認します。
$ dpkg --get-selections |grep linux-
linux-base					install
linux-cloud-tools-4.4.0-51			install
linux-cloud-tools-4.4.0-51-generic		install
linux-cloud-tools-common			install
linux-cloud-tools-generic			install
linux-firmware					install
linux-generic					install
linux-headers-4.4.0-59				install
linux-headers-4.4.0-59-generic			install
linux-headers-generic				install
linux-image-4.4.0-59-generic			install
linux-image-extra-4.4.0-59-generic		install
linux-image-extra-virtual			install
linux-image-generic				install
linux-libc-dev:amd64				install
linux-signed-generic				install
linux-signed-image-4.4.0-59-generic		install
linux-signed-image-generic			install
linux-sound-base				install
linux-tools-4.4.0-51				install
linux-tools-4.4.0-51-generic			install
linux-tools-common				install
linux-tools-generic				install
syslinux-common					install
syslinux-legacy					install
3.参考
ansibleのベストプラクティスなplaybookレイアウトを作るシェル
ansibleのベストプラクティスなplaybookディスクレイアウトがあります。
このディレクトリを手動で作成するのが面倒なので簡単なシェルを作成しました。
こんなディレクトリレイアウトとmain.ymlの空ファイルを作成します。
group_vars/
host_vars/
site.yml                  # master playbook
roles/
    RoleName1/               # this hierarchy represents a "role"
        tasks/            #
            main.yml      #  <-- tasks file can include smaller files if warranted
        handlers/         #
            main.yml      #  <-- handlers file
        templates/        #  <-- files for use with the template resource
        files/            #
        vars/             #
            main.yml      #  <-- variables associated with this role
        defaults/         #
            main.yml      #  <-- default lower priority variables for this role
        meta/             #
            main.yml      #  <-- role dependencies
コードはこちら。
gitの初期設定をしてGitHubからレポジトリをcloneするまでの手順
はじめに
PCを再セットアップした後、いつも設定方法を忘れてgoogleさんに聞いて面倒なので、まとめました。
git初期設定
ユーザ設定&pushモード設定
(1)メールアドレス、(2)名前、(3)push時のモードを指定して、最後に設定内容を確認。
git config --global user.email "xxxxxxx@gmail.com"
git config --global user.name "xxxxxxxx"
git config --global push.default simple

git config --global -l
git認証情報の自動保存設定
# Linuxで認証情報を保存したい場合
git config --global credential.helper store
git Proxy設定(必要があれば)
git config --global http.proxy http://proxy.example.com:3128
git config --global https.proxy http://proxy.example.com:3128
git を使いやすくする設定
コミットログを見やすくするコマンドのエリアス
~/.gitconfigに下記を追加
[alias]
    lga = log --graph --all --pretty=format:'%C(red)%h %C(reset)-%C(yellow)%d%C(reset) %s %C(green)(%cr) %C(bold blue)<%an>%C(reset)'
    lg  = log --graph       --pretty=format:'%C(red)%h %C(reset)-%C(yellow)%d%C(reset) %s %C(green)(%cr) %C(bold blue)<%an>%C(reset)'
- 使い方:
git lga、またはgit lgと実行
GitHubからcloneする
(既存レポジトリがない場合)新規にレポジトリの作成
- "New repository"からレポジトリを作成
- 必要な項目を設定
- レポジトリ名を指定(Repository name)
- "Initialize this repository with a README"をチェック
- "Add .gitignore"で開発したい言語のgitigonreテンプレを選択
- "Add a license"で開発するブツのライセンスを指定(Apache LicenseとかGPLv3とか)
- "Create repository"でレポジトリを作成
レポジトリをcloneする
- gitコマンドでcloneする
- 格納したいディレクトリに移動し
- "git clone <コピーしたURL>"でデータをローカルにcloneする
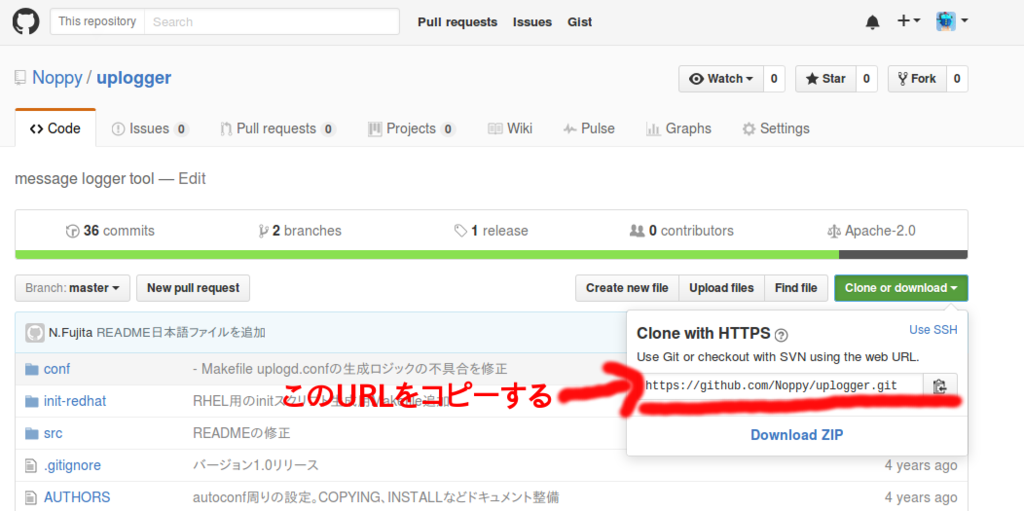
$ git clone https://github.com/Noppy/uplogger.git
Cloning into 'uplogger'...
remote: Counting objects: 254, done.
remote: Total 254 (delta 0), reused 0 (delta 0), pack-reused 254
Receiving objects: 100% (254/254), 382.28 KiB | 226.00 KiB/s, done.
Resolving deltas: 100% (141/141), done.
Checking connectivity... done.
KickStartその3(ネットワーク構成例 -vlan、bonding構成も)
0.関連記事一覧
- KickStartによる自動インストールの説明
- その1 KickStartによるOS自動インストールの全体の流れ
- その2 ks.cfg設定ファイルの説明
- その3 KickStartネットワーク構成(この記事)
1.はじめに
KickStarでosを自動インストールするときのネットワーク設定について、構成例をケース毎に説明します。vlan、bondや、vlanとbondを組み合わせた構成も説明します。
2.ネットワーク構成例
2.1静的IP構成
(1)構成イメージ

(2)KickStart設定例
networkオプションで設定します。"--bootproto=static"とし、IPなど必要な設定を行います。
# Network information
network --bootproto=static --ip=10.0.2.15 --netmask=255.255.255.0 --gateway=10.0.2.2 --nameserver=192.168.11.1 --device=enp0s3 --noipv6 --activate
network --hostname=Server1
2.2DHCP設定の場合
(1)構成イメージ

2.3複数セグメント設定
(1)構成イメージ

(2)KickStart設定例
複数セグメントがある場合は、networkオプションを複数行記載します。
network --bootproto=dhcp --device=enp0s3 --noipv6 --activate network --bootproto=static --device=enp0s8 --ip=192.168.0.20 --netmask=255.255.255.0 --nodefroute --nodns --noipv6 --activate network --hostname=Server1
2.4VLAN設定
(1)構成イメージ

(2)KickStart設定例
networkオプションで、"--vlanid="でVLAN IDを指定します。デバイス名を指定したい場合は、"--interfacename="を使います。未指定の場合は、"デバイス名.VLAN-ID"名称になります。
network --bootproto=dhcp --device=enp0s3 --noipv6 --activate network --bootproto=static --device=enp0s8 --ip=192.168.0.20 --netmask=255.255.255.0 --nodefroute --nodns --noipv6 --activate network --device=enp0s8 --vlanid=1000 --interfacename=enp0s8.1000 --bootproto=static --ip=192.168.10.20 --netmask=255.255.255.0 --nodefroute --nodns --noipv6 --activate network --hostname=Server1
2.5bond設定(ネットワーク冗長化設定)
(1)構成イメージ

(2)KickStart設定例
networkオプションでもbond構成を設定可能ですが、slaveデバイスがMacアドレス指定となるのが難点です。(LANカード交換によるmacアドレス変更後に設定変更が必要になるため)。slave指定をデバイス名(enp0s8とか)で指定するため、インストールの後処理(%post〜%endセクション)でNetworkManager(nmcliコマンド)で設定を作成し、インストールイメージにコピーする手段をとっています。post処理はNetworkManagerのデーモン経由の処理になるので、chrootを無効化して処理させます。
network --bootproto=dhcp --device=enp0s3 --noipv6 --activate network --hostname=Server1 <中略> %post --nochroot --log=/mnt/sysimage/root/ks-post-log.log # delete enp0s8n and enp0s9 configuration file nmcli c delete enp0s8 nmcli c delete enp0s9 # add a bond device nmcli c add type bond ifname bond0 con-name bond0 mode active-backup miimon 100 updelay 600 primary enp0s8 nmcli c mod bond0 ipv4.method manual ipv4.address "192.168.0.20/24" ipv4.never-default yes nmcli c mod bond0 ipv6.method ignore ipv6.never-default yes nmcli c add type bond-slave ifname enp0s8 con-name bond0-enp0s8 master bond0 nmcli c add type bond-slave ifname enp0s9 con-name bond0-enp0s9 master bond0 # copy network configurate files to the install image rm -rf /mnt/sysimage/etc/sysconfig/network-scripts/ifcfg-* cp -p /etc/sysconfig/network-scripts/ifcfg-* /mnt/sysimage/etc/sysconfig/network-scripts/ %end
2.6bond-vlan設定
(1)構成イメージ

(2)KickStart設定例
応用です。bondデバイスを作成し、その上にVLANを設定する例です。
# Network information
network --bootproto=dhcp --device=enp0s3 --noipv6 --activate
network --hostname=Server1
<中略>
%post --nochroot --log=/mnt/sysimage/root/ks-post-log.log

# delete enp0s8n and enp0s9 configuration file
nmcli c delete enp0s8
nmcli c delete enp0s9

# add a bond device
nmcli c add type bond ifname bond0 con-name bond0 mode active-backup miimon 100 updelay 600 primary enp0s8
nmcli c mod bond0 ipv4.method disabled ipv6.method ignore
nmcli c add type bond-slave ifname enp0s8 con-name bond0-enp0s8 master bond0
nmcli c add type bond-slave ifname enp0s9 con-name bond0-enp0s9 master bond0

# add vlan devices(disable ipv4/v6 address)
nmcli c add type vlan ifname bond0.1000 con-name bond0.1000 dev bond0 id 1000
nmcli c mod bond0.1000 ipv4.method manual ipv4.address "192.168.10.20/24" ipv4.never-default yes
nmcli c mod bond0.1000 ipv6.method ignore

# copy network configurate files to the install image
rm -rf /mnt/sysimage/etc/sysconfig/network-scripts/ifcfg-*
cp -p /etc/sysconfig/network-scripts/ifcfg-* /mnt/sysimage/etc/sysconfig/network-scripts/

%end
2.7vlan-bond設定
(1)構成イメージ

(2)KickStart設定例
上記の逆で、VLANデバイスを束ねてbondデバイスを構成する例です。あまり用途はないと思いますが。
network --bootproto=dhcp --device=enp0s3 --noipv6 --activate
network --hostname=Server1
<中略>
%post --nochroot --log=/mnt/sysimage/root/ks-post-log.log

# disable ipaddress at enp0s8n and enp0s9
nmcli c mod enp0s8 ipv4.method disabled ipv6.method ignore
nmcli c mod enp0s9 ipv4.method disabled ipv6.method ignore

# add vlan devices(disable ipv4/v6 address)
nmcli c add type vlan ifname enp0s8.1000 con-name enp0s8.1000 dev enp0s8 id 1000
nmcli c add type vlan ifname enp0s9.1000 con-name enp0s9.1000 dev enp0s9 id 1000
nmcli c mod enp0s8.1000 ipv4.method disabled ipv6.method ignore
nmcli c mod enp0s9.1000 ipv4.method disabled ipv6.method ignore

# add a bond device
nmcli c add type bond ifname bond0 con-name bond0 mode active-backup miimon 100 updelay 600 primary enp0s8.1000
nmcli c mod bond0 ipv4.method manual ipv4.address "192.168.10.20/24" ipv4.never-default yes
nmcli c mod bond0 ipv6.method ignore
nmcli c add type bond-slave ifname enp0s8.1000 con-name bond0-enp0s8.1000 master bond0
nmcli c add type bond-slave ifname enp0s9.1000 con-name bond0-enp0s9.1000 master bond0
nmcli c mod enp0s8.1000 connection.master bond0 connection.slave-type bond
nmcli c mod enp0s9.1000 connection.master bond0 connection.slave-type bond

# copy network configurate files to the install image
rm -rf /mnt/sysimage/etc/sysconfig/network-scripts/ifcfg-*
cp -p /etc/sysconfig/network-scripts/ifcfg-* /mnt/sysimage/etc/sysconfig/network-scripts/

%end
KickStartその2(ks.cfg設定ファイルの説明)
0.関連記事一覧
- KickStartによる自動インストールの説明
- その1 KickStartによるOS自動インストールの全体の流れ
- その2 ks.cfg設定ファイルの説明(このエントリー)
- その3 KickStartネットワーク構成
1.はじめに
この記事は、RHEL/fedoraのOS自動インストールを行うKickStartの設定ファイル(ks.cfg)の書き方の詳細です。ネットワーク設定、ディスク設定、パッケージ設定、ユーザ設定、を中心に編集頻度が高そうな項目を説明します。
2.ネットワーク設定
(1)スタティック設定例
enp0s3,enp0s8双方をstaticでネットワーク設定する場合の例です。
# Network information
network --bootproto=static --device=enp0s3 --ip=10.0.2.15    --netmask=255.255.255.0 --gateway=10.0.2.2 --nameserver=10.0.2.3  --noipv6 --activate
network --bootproto=static --device=enp0s8 --ip=192.168.0.20 --netmask=255.255.255.0 --noipv6 --activate --nodefroute
network --hostname=testserve
- "--bootproto=static"とすることで、静的設定になります。
- "--device"で、設定するデバイスを指定します。
- "--ip"、"--netmask="、"--gateway="でIP設定をします。
- "--nameserver"で、参照先DNSを指定します。DNSが複数ある場合は、"=x.x.x.x,y.y.y.y"とカンマで区切って指定します。
- "--noipv6"で、ipv6を無効化します。
- "--activate"を付けることで、boot時にデバイスが有効化されます。
- "--nodefroute "は、デフォルトGWと通信しないデバイスに設定します。
- "network --hostname=xxxx"で、ホスト名を設定します。
(2)DHCP設定例
enp0s3をDHCP設定に変更した例です。
# Network information
network --bootproto=dhcp   --device=enp0s3 --noipv6 --activate
network --bootproto=static --device=enp0s8 --ip=192.168.0.20 --netmask=255.255.255.0 --noipv6 --activate --nodefroute
network --hostname=testserver
bonding・vlanと組み合わせた構成は下記記事を参照して下さい。
nopipi.hatenablog.com
3.ディスク設定
インストール時のディスク構成(パーティション、LVM、ファイルシステムなど)を指定します。ディスク設定は、設計したディスク構成になるよう手動で組み直したほうが基本良さそうです。
(1)ブートディスク構成例*1

(2)上記構成例の場合のKickStart設定
# Specifies used disk for installation
ignoredisk --only-use=sda

# System bootloader configuration
bootloader --append=" crashkernel=auto" --location=mbr --boot-drive=sda

# Partition clearing information
clearpart --all --initlabel --drives sda

# Disk partitioning information
part pv.295 --fstype="lvmpv" --ondisk=sda --size=1    --grow
part /boot  --fstype="xfs"   --ondisk=sda --size=500  --label=boot
volgroup rootvg --pesize=4096 pv.295
logvol swap  --fstype="swap" --size=256        --name=swaplv --vgname=rootvg
logvol /home --fstype="xfs"  --size=100        --name=homelv --vgname=rootvg --label="home"
logvol /     --fstype="xfs"  --size=1   --grow --name=rootlv --vgname=rootvg --label="root"
- インストーラが対象とするディスクの指定
- "ignoredisk"で"--only-use="オプションを設定すると、指定したディスクのみインストーラの対象になります。
- ブートローダの指定
- ディスクフォーマット(既存パーティション削除)
- パーティション設定
- LVM
4.インストールパッケージ設定
インストルするパッケージは、下記のように"%packages 〜 %end"のセクションの間で設定します。基本はGUIで設定内容に足りないパッケージを追加するのが簡単です。
%packages
@^infrastructure-server-environment
@base
@compat-libraries
@core
@large-systems
@performance
@security-tools
kexec-tools
telnet
trace-cmd
vim
%end
- @で始まるのがインストールするパッケージグループです。
- 足りないパッケージを個別に追加します。
5.ユーザ設定
(1)rootユーザのパスワード設定
rootユーザのパスワードは"rootpw"で設定します。パスワードは、(a)平文文字列、または(b)暗号化された文字列で指定できます。
(1)-(a)パスワードを平文で記載する場合
オプション無し、または"--plaintext"オプションを付けることで、平文でrootユーザのパスワードを指定します。その場合、パスワードが丸見えになるので、KickStartファイルの管理には十分注意してください。
rootpw --plaintext "SyokiPass@9999"
(1)-(b)暗号化したパスワードで記載する場合
"--iscrypted"オプションを付けることで、暗号化された文字列でパスワードを指定します。暗号化されたと言っても時間をかければ解読できるので、KickStartファイルの管理はやはり注意してください。
- "/etc/shadow"に登録する形式で暗号化した文字列で指定します。
- 暗号化形式は"auth"で指定され形式になります。例えば、"auth --enableshadow --passalgo=sha512"とある場合は、SHA512形式の暗号化になります。
- 暗号化されたパスワードの作り方は、次項目(2)を参照して下さい。
# Root password
rootpw --iscrypted $6$WYz7GsXMGCHrJnw.$BoSTW/Ac9vaVvjwB0NVg3.sccEh2g7eZhU7c7BRRx/d8Dxoo7UE70EYyhPEBiemPLxB.Pq0StVaoDIWTWLCFx/
(2)指定する暗号文字列をどうするか?
やり方として2例、(a)pythonで生成する、(b)設定したいパスワードが入った"/etc/shadow"ファイルからコピーする、を説明します。なおネットで見るとopensslコマンドで暗号文字列を生成という記事があるのですが、現在主流のSHA512には対応していないので、この方法は取れません。*3
(3)-(a)pythonで生成する
端的に例を説明すると、"SyokiPass@9999"というパスワードをSHA512形式で暗号化する場合は以下のコマンドになります。
# python -c 'import crypt; print(crypt.crypt("SyokiPass@9999", crypt.METHOD_SHA512))'
sha512は、暗号をより強固なものにするため「暗号したい文字列」と「salt(ソルト)」と呼ばれる文字列を組み合わせ暗号化します。上の例では、"crypt.METHOD_SHA512"の部分がSHA512形式のsalt文字列を生成&入力している部分になります。さらにこの例ではsalt文字列を乱数生成しています。*4
(3)-(b)"/etc/shadow"からコピーする
pythonから生成すればいいので、このやり方は実質不要ですが、一旦インストールした後または、適当なユーザを作成してパスワードを設定しshadowファイルから文字列を抜き出します。":"がフィールドの区切り文字になり、第2フィールドが暗号化された文字列のフィールドになるので、ここをコピーして利用します。
#grep '^root' /etc/shadow
root:$6$WYz7GsXMGCHrJnw.$BoSTW/Ac9vaVvjwB0NVg3.sccEh2g7eZhU7c7BRRx/d8Dxoo7UE70EYyhPEBiemPLxB.Pq0StVaoDIWTWLCFx/::0:99999:7:::
6.その他
(1)GUI/textモードの指定
KickStartファイルの動作確認をする場合はグラフィカルのほうが使いやすいかもしれないですが、最終的に何台ものマシンにセットアップする場合は、textモードが早くて良いと思います。
- グラフィカル(GUI)モードにする場合
graphical
- テキストモードにする場合
text
(2)selinux設定
selinuxの設定。無効化(--disabled)、有効化(--enforcing)、警告出力(--permissive)を選択します。
selinux [--disabled|--enforcing|--permissive]
(3)サービス設定
サービスの有効・無効設定を行います。カンマ区切りで複数サービスを指定する場合は、スペースを入れるとそれ以降は認識されません。
- サービスの有効化
services --enabled=SERVICE1,SERVICE2,SERVICE3
- サービスの無効化
services --disabled=SERVICE1,SERVICE2,SERVICE3
(4)KickStart完了後の挙動
- リブートする場合:"reboot --eject" ※"-eject"はdvdを排出するオプション
- 電源OFFする場合:"poweroff"
- 一時停止する場合:"halt"
7.設定ファイル例
ks.cfgの設定例です。
#version=DEVEL
# System authorization information
auth --enableshadow --passalgo=sha512
repo --name="Server-HighAvailability" --baseurl=file:///run/install/repo/addons/HighAvailability
repo --name="Server-ResilientStorage" --baseurl=file:///run/install/repo/addons/ResilientStorage

# Use CDROM installation media
cdrom

# Select Install mode. graphical:Use graphical install, text:Use text install.
#graphical
text

# Run the Setup Agent on first boot
firstboot --enable
ignoredisk --only-use=sda
# Keyboard layouts
keyboard --vckeymap=jp --xlayouts='jp'
# System language
lang ja_JP.UTF-8

# Network information
network  --bootproto=dhcp --device=enp0s3 --noipv6 --activate
network  --hostname=testserver

# Root password
rootpw --iscrypted $6$WYz7GsXMGCHrJnw.$BoSTW/Ac9vaVvjwB0NVg3.sccEh2g7eZhU7c7BRRx/d8Dxoo7UE70EYyhPEBiemPLxB.Pq0StVaoDIWTWLCFx/
# System timezone
timezone Asia/Tokyo --isUtc
# System bootloader configuration
bootloader --append=" crashkernel=auto" --location=mbr --boot-drive=sda
# Partition clearing information
clearpart --all --initlabel --drives sda

# Disk partitioning information
part pv.295 --fstype="lvmpv" --ondisk=sda --size=1    --grow
part /boot  --fstype="xfs"   --ondisk=sda --size=500  --label=boot
volgroup rootvg --pesize=4096 pv.295
logvol swap  --fstype="swap" --size=256        --name=swaplv --vgname=rootvg
logvol /home --fstype="xfs"  --size=100        --name=homelv --vgname=rootvg --label="home"
logvol /     --fstype="xfs"  --size=1   --grow --name=rootlv --vgname=rootvg --label="root"

%packages
@^infrastructure-server-environment
@base
@compat-libraries
@core
@large-systems
@performance
@security-tools
kexec-tools
telnet
trace-cmd
vim
%end

%addon com_redhat_kdump --enable --reserve-mb='auto'

%end

# Reboot after the installation is complete.(eject DVD media before rebooting)
reboot --eject
*1:このレイアウトはRHELの推奨構成とはことなります。例えばswapが小さかったりするので注意してください。
*2:"--initlabel"は廃止されたようですが、anacondaが自動生成したanaconda-ks.cfgではオプションが付いているので、そのままにしています。参考→32.4. キックスタートのオプション - Red Hat Customer Portal
*3:opensslコマンドがSHA512で使えない件の参考:sha512でハッシュされたsaltつきパスワードを生成するには | Nobwak's Lair。
*4:rhelインストールガイドにpythonの例が改定あるのですが、saltの説明が雑なので、しょうがなくKickstartのコードを参考にしています。anaconda/users.py at master · rhinstaller/anaconda · GitHubの"def cryptPassword(password, algo=None):"を参考にしています。
KickStartその1(KickStartによるLinux自動インストール概要)
0.関連記事一覧
- KickStartによる自動インストールの説明
- その1 KickStartによるOS自動インストールの全体の流れ(このエントリー)
- その2 ks.cfg設定ファイルの説明
- その3 KickStartネットワーク構成
1.はじめに
2.利用手順
2.1ファイル(ks.cfg)の編集
普通にインストールすると、rootのホームディレクトリ直下に"anaconda-ks.cfg"ファイルが作成されているので、このファイルを元に必要な部分を編集します。ファイル名は、特にこだわりがなければKickStartデフォルトの"ks.cfg"にしておくとブート時の設定が少し省けて良いです。*3
■ks.cfgの例(RHELのDVDメディアからインストールする場合の設定例)
設定内容については、こちらの記事を参照して下さい。
#version=DEVEL
# System authorization information
auth --enableshadow --passalgo=sha512
repo --name="Server-HighAvailability" --baseurl=file:///run/install/repo/addons/HighAvailability
repo --name="Server-ResilientStorage" --baseurl=file:///run/install/repo/addons/ResilientStorage

# Use CDROM installation media
cdrom

# Select Install mode. graphical:Use graphical install, text:Use text install.
#graphical
text

# Run the Setup Agent on first boot
firstboot --enable
ignoredisk --only-use=sda
# Keyboard layouts
keyboard --vckeymap=jp --xlayouts='jp'
# System language
lang ja_JP.UTF-8

# Network information
network  --bootproto=dhcp --device=enp0s3 --noipv6 --activate
network  --hostname=testserver

# Root password
rootpw --iscrypted $6$WYz7GsXMGCHrJnw.$BoSTW/Ac9vaVvjwB0NVg3.sccEh2g7eZhU7c7BRRx/d8Dxoo7UE70EYyhPEBiemPLxB.Pq0StVaoDIWTWLCFx/
# System timezone
timezone Asia/Tokyo --isUtc
# System bootloader configuration
bootloader --append=" crashkernel=auto" --location=mbr --boot-drive=sda
# Partition clearing information
clearpart --all --initlabel --drives sda

# Disk partitioning information
part pv.295 --fstype="lvmpv" --ondisk=sda --size=1    --grow
part /boot  --fstype="xfs"   --ondisk=sda --size=500  --label=boot
volgroup rootvg --pesize=4096 pv.295
logvol swap  --fstype="swap" --size=256        --name=swaplv --vgname=rootvg
logvol /home --fstype="xfs"  --size=100        --name=homelv --vgname=rootvg --label="home"
logvol /     --fstype="xfs"  --size=1   --grow --name=rootlv --vgname=rootvg --label="root"

%packages
@^infrastructure-server-environment
@base
@compat-libraries
@core
@large-systems
@performance
@security-tools
kexec-tools
telnet
trace-cmd
vim
%end

�don com_redhat_kdump --enable --reserve-mb='auto'

%end

# Reboot after the installation is complete.(eject DVD media before rebooting)
reboot --eject
2.2ファイル検証
作成したファイルは、ksvalidatorコマンドで内容を検証します。
ksvalidatorは通常はインストールされていませんので、yum/dnfコマンドでパッケージを個別にインストールします。
# yum install pykickstart
検証は以下のコマンドで実行します。
$ ksvalidator ks.cfg
KickStartのバージョン毎の構文差異を気にする場合は、インストールするOSバージョンを指定して、検証することもできます。*4
$ ksvalidator -v RHEL7 ks.cfg
2.3インストーラを起動しキックスタートをローディングする
主な方法を以下に列挙します。個人的には、ネットワークが使えるならネット(http/httpsなど)、ネットワークが使えないならフロッピー(判別しやすいから)から設定ファイルを読みこませるのがいいと思っています。
- インストーラを起動する。(私はRHELのDVDメディアからブート)
- 起動画面で"tabキー"で介入し"ks="、または"inst.ks="オプションでキックスタートファイルの場所を指定する。(下記画面参照)*5
- httpの例:"inst.ks=http://192.168.0.1/ks.cfg"
- フロッピーの例:"inst.ks=hd:fd0:/ks.cfg"
- DVDの例:"inst.ks=cdrom:/ks.cfg"
※ファイルがメディア直下で、ファイル名が"ks.cfg"の場合は、":/ks.cfg"を省略可能です。

3.補足(kickstartファイルを読み込ませるベストプラクティス)
KickStartファイルをどう読み込ませるか以外に悩みましたので、私なりの考え方を整理しました。
(2)ネットワークが使えない場合
この場合が悩ましいです。私がおすすめと思った順に記載します。
(2)-1 インストーラをカスタマイズする
インストーラのイメージをカスタマイズして、作成したファイルを組み込み自動的に読み込ませるのが一番確実で、全自動化が可能です。ですが、リビジョンや設定を変更都度に、インストールイメージを作りなおさなければならないのが手間なので、OSインストールの頻度が低い場合は逆に非効率かもしれません。
(2)-2 フロッピーから読み取る
RHELドキュメントには詳細な説明が無いのが気になりますが・・・。ですが個人的には、フロッピーが使える環境であればフロッピーから読み込ませるのが、デバイス名が"fd0"で明確なのもあり、一番無難な気がします。*6
4.リファレンス(kickstartドキュメント)
必要な情報は大方、利用するRHEL/fedoraバージョンの「インストールガイド」の終盤にある「キックスタートを使ったインストール」という章に載っています。
- RHEL
- RHEL6 インストールガイド:第32章 キックスタートを使ったインストール
- RHEL7 インストールガイド:第23章 キックスタートを使ったインストール
- Fedora
- Fedora24 Installation Guide:
- Upstream
*1:RHEL/Fedoraのインストーラであるanacondaに含まれる機能です。kickStartを含むanacondaは、redhat社の「Red Hat Installer Engineering Team」が開発しており、ソース&ドキュメントはgithub(Red Hat Installer Engineering Team · GitHub)で公開されています。
*2:以前はファイル作成用のGUIがありましたが、今は開発が放置されているので利用は推奨されないようですインストールガイド 23.2. キックスタートを使ったインストールの実行方法の重要を参照。
*3:anacondaの中のdracut用モジュールに"fetch-kickstart-disk"というシェルがあり、そこでファイルのパスのデフォルトが"/ks.cfg"と定義されています。
*4:指定できるバージョン一覧は、"ksvalidator -l dummy"コマンドで確認できます。ファイルパスの文字を何かしら入れないとエラーになるあたりが微妙ですが。
*5:どちらでも利用可能ですが、以前の書き方が"ks="で、最近は"inst.ks="が基本のようです。
*6:以前は、ks=floppyで読み込めましたが、今はks=hd:fd0のように指定します。
Macbook Air(2010/A1370)にUbuntu16.04 LTS(Xenial Xerus)を入れてみた
1.はじめに
この記事は下記記事の焼き直しで、MacbooAir3.1(2010年:A1370)にUbuntu16.04をインストールした記録です。
nopipi.hatenablog.com
前提は以下の通りです。
- 入れる箱(Mac)
- Macbook Air A1370(2010年モデル)
- 入れるもの
- Ubuntu16.04 LTS(Xenial Xerus) ※今回は日本語Remix版を利用
- インストールメディア(USBブート)作成環境
- Windows10
- USBブートメディア作成ツール: "Universal-USB"
2.準備(インストールメディア)
ubuntuのインストール用メディアのisoをUSBメモリに突っ込んで、USBメモリブートでインストールします。
インストールメディアを用意
ubuntuからダウンロード
USBメモリブートメディア作成
今回は、"Universal-USB"というツールを利用しました。
Universal USB Installer - Easy as 1 2 3 | USB Pen Drive Linux
手順は、下記サイトを参考にしています。
3.インストール

4.MacBook用のubuntu設定
ファンクションキーの反転
初期状態では、ファンクションキーは音声や液晶の明るさ調整がメインで、F1やF2とかファンクションキーとして利用する場合は、fnキーと組み合わせる必要があります。ですが、日本語変換の時面倒なので機能を反転させます。
以下のページを参考にしました。
$ sudo vi /etc/rc.local
下記の行を追加
echo 2 > /sys/module/hid_apple/parameters/fnmode
マウス変更
2本指で操作の設定。→デフォルトでONのため設定不要。
設定は、左バーの「システム設定」→「マウスとタッチパッド」を選択して設定。

5.使いやすくするために
ランチャーへの登録
デフォルトではターミナルが、左メニューバー(Launcher)にないので追加します。
- ランチャーの一番上のボタンを押し検索画面を出す
- 検索ボックスから「Ter・・・」と入力すると、ターミナルが表示されるので実行する。
- 実行するとlauncherに実行アプリのボタンが追加されるので、右クリックして「Launcherに登録」を実行
アップデート
立ち上げて暫くするとアップデートを促するメニューが出てそれを実行すればよいですが、手動実行する場合は以下の通り実行します。
GUIから実行
- 検索から「update」と入力し、アプリを実行
パッケージの追加インストール
sudo apt-get install vim
sudo apt-get install openssh-server
sudo apt-get install gimp
ntpサーバ設定
ntpの接続先サーバを国内の"ntp.nict.jp"に変更する。
●/etc/systemd/timesyncd.conf
[Time]
NTP=ntp.nict.jp  <<="ntp.nict.jp"を追加する
#NTP=
#FallbackNTP=ntp.ubuntu.com
サービスの再起動と状態確認
$ sudo systemctl -l restart systemd-timesyncd
$ sudo systemctl -l status systemd-timesyncd
● systemd-timesyncd.service - Network Time Synchronization
   Loaded: loaded (/lib/systemd/system/systemd-timesyncd.service; enabled; vendor preset: enabled)
  Drop-In: /lib/systemd/system/systemd-timesyncd.service.d
           └─disable-with-time-daemon.conf
   Active: active (running) since 月 2016-06-06 17:01:54 JST; 2s ago
     Docs: man:systemd-timesyncd.service(8)
 Main PID: 2948 (systemd-timesyn)
   Status: "Synchronized to time server 133.243.238.164:123 (ntp.nict.jp)."
   CGroup: /system.slice/systemd-timesyncd.service
           └─2948 /lib/systemd/systemd-timesyncd

 6月 06 17:01:54 xxx systemd[1]: Starting Network Time Synchronization...
 6月 06 17:01:54 xxx systemd[1]: Started Network Time Synchronization.
 6月 06 17:01:54 xxx systemd-timesyncd[2948]: Synchronized to time server 133.243.238.164:123 (ntp.nict.jp).
その他Tips
- 日本語変換の切り替え
- 「Control+Space」で切り替え。
gccのインラインアセンブラで使えるx86系の汎用レジスタの制御子(Constraints)
一覧
| インラインアセンブラ 制御子 | レジスタ名称 | |
|---|---|---|
| x86(32bit) | x86_64(64bit) | |
| a | eax | rax |
| b | ebx | rbx |
| c | ecx | rcx |
| d | edx | rdx |
| S | esi | rsi |
| D | edi | rdi |
| r8 | - | r8 |
| r9 | - | r9 |
| r10 | - | r10 |
| r11 | - | r11 |
| r12 | - | r12 |
| r13 | - | r13 |
| r14 | - | r14 |
| r15 | - | r15 |
ネタ
- gccのマニュアル(6.44.3 Constraints for asm Operands)
- IntelのCPUを調べるにはこれ[http://www.intel.co.jp/content/www/jp/ja/processors/architectures-software-developer-manuals.html:title]
- 3.2 OVERVIEW OF THE BASIC EXECUTION ENVIRONMENT
- 3.4 BASIC PROGRAM EXECUTION REGISTERS
- 3.1.1.1 Opcode Column in the Instruction Summary Table (Instructions without VEX prefix)
- Table 3-1. Register Codes Associated With +rb, +rw, +rd, +ro
- 3.1.1.1 Opcode Column in the Instruction Summary Table (Instructions without VEX prefix)
32bitアプリの2038年問題に対してglibc介さずシステムコールを直接呼べば何とかなるかなという浅はかな考えがやっぱり浅はかだった件
はじめに
ラノベのようなタイトルの通り、
ですが。。。。
「そりゃそうだろ、うまく行ってしまったら32bitアプリとの互換性が維持できないだろうさ」という冷やかな視線を感じますが(><)、せっかく試したのでまとめます。
32bitアプリの2038年問題回避方法
2038年問題とは、32bitアプリケーションでは通常"符号ありlong int"で扱うため、2038年でオーバフローする問題です。
その回避策として一般的なのが、独自に"long long int"で64bitの変数を作るか、"符号なしlong int"で処理という方法らしいです。(wikipediaによると)
- 詳細はこちらを参照-->2038年問題 - Wikipedia
標準のCライブラリ(glibcとか)は当然"符号ありlong int"なので、この回避策をするためには、時刻処理を何らかの形で独自実装するしかありません。
例えば下記のような方法で、補正をかけるラップ関数を実装する方法などです。(結論から言うと下記リンク先の対応が現実解だったのですが・・・)
実験のコード
コードの説明
カーネルから時刻取得するためには、clock_gettimeのシステムコールを利用します。比較で普通にglibc関数を利用する方法と、アセンブラで呼びだす両方を実行してみます。
具体的には下記コードでは、32bit/64bit環境それぞれで、下記処理をしています。
- glibcのclock_gettime()関数を利用して時刻取得する(普通の方法)
- (実験メイン)アセンブラで直接clock_gettimeシステムコールを呼びだし時刻取得する
- 32bitの場合、(a)32bitのtimespec構造体、(b)64bitのtimespec構造体(long long int)それぞれで取得する
- 64bitの場合、(a)64bitのtimespec構造体で取得する。
- なおアセンブラで呼びだす場合のtimespec構造体は、32/64bit環境のbit長差異をないことを明確にするため、32bit長ではint型、64bitでは"long long int"で独自定義している
なお、いろいろぐちゃぐちゃやっていたので、余計なコードが入っていますが、ご容赦ください。
コード(time.c)
#include <stdio.h>
#include <stdlib.h>
#include <string.h>
#include <time.h>
#define _GNU_SOURCE
#include <unistd.h>
#include <sys/syscall.h>
#include <sys/types.h>

#define SYS_clock_gettime32 20
#define SYS_clock_gettime64 228


struct timespec32_test {
	int tv_sec;
	int tv_nsec;
};

struct timespec64_test {
	long long int tv_sec;
	long long int tv_nsec;
};


void printf_timespec(struct timespec *tp, int ret, char *mes)
{

	printf("%-40s " ,mes);
	printf("tv_sec=%-12ld ",tp->tv_sec);
	printf("tv_nsec=%-12ld ",tp->tv_nsec);
	printf("ret=%d\n",ret);

}

void printf_timespec32_test(struct timespec32_test *tp, int ret, char *mes)
{

	printf("%-40s ",mes);
	printf("tv_sec=%-12d ",tp->tv_sec);
	printf("tv_nsec=%-12d ",tp->tv_nsec);
	printf("ret=%d\n",ret);

}

void printf_timespec64_test(struct timespec64_test *tp, int ret, char *mes)
{
	printf("%-40s ",mes);
	printf("tv_sec=%-12lld ",tp->tv_sec);
	printf("tv_nsec=%-12lld ",tp->tv_nsec);
	printf("ret=%d\n",ret);
}

int main()
{
	struct timespec tp;
	struct timespec64_test tp64;
#if defined(__i386__) || defined(__ILP32__)
	struct timespec32_test tp32;
#endif
	pid_t  pid;
	int ret;
	char *mes;

	/* info */
	pid=getpid();
	printf("PID=%d\n",pid);

	mes = "glibc clock_gettime-long int";
	tp.tv_sec=tp.tv_nsec=0;
	ret = clock_gettime(CLOCK_REALTIME,&tp);
	printf_timespec(&tp, ret, mes);

#if defined(__i386__) || defined(__ILP32__)
	/* 32bit application */
	mes = "Assemble=>i386 int 0x80-timespec-32bit";
	tp32.tv_sec=tp32.tv_nsec=0;
	__asm__ volatile(
	        "int $0x80;"
	        :"=a"(ret)
	        :"0"(SYS_clock_gettime),
	         "b"(CLOCK_REALTIME),
	         "c"(&tp32)
	);
	printf_timespec32_test(&tp32, ret, mes);

	mes = "Assemble=>i386 int 0x80-timespec-64bit";
	tp64.tv_sec=tp64.tv_nsec=0;
	__asm__ volatile(
	        "int $0x80;"
	        :"=a"(ret)
	        :"0"(SYS_clock_gettime),
	         "b"(CLOCK_REALTIME),
	         "c"(&tp64)
	);
	printf_timespec64_test(&tp64, ret, mes);

#else
	/* 64bit application */
	mes = "Assemble=>x86_64 syscall-timespec-64bit";
	tp64.tv_sec=tp64.tv_nsec=0;
	__asm__ volatile(
	        "syscall;"
	        :"=a"(ret)
	        :"0"(SYS_clock_gettime),
	         "D"(CLOCK_REALTIME),
	         "S"(&tp64)
	        :"memory"
	);
	printf_timespec64_test(&tp64, ret, mes);
#endif

	return(EXIT_SUCCESS);
}
実行結果
64bit環境
何も細工していないので、アセンブラで呼びだしても普通に応答が帰ってきます。
$ gcc -m64 -o time64 -g3 -Wall -O0  time.c
$ ./time64
PID=5434
glibc clock_gettime-long int             tv_sec=1452509660   tv_nsec=790867319    ret=0
Assemble=>x86_64 syscall-timespec-64bit  tv_sec=1452509660   tv_nsec=790892879    ret=0
32bit環境
32bitの時刻構造体のポインタを渡したときは普通ですが、64bitの時刻構造体のポインタを無理やり渡しても、当然おかしな結果になっているのがよく分かります(^^;
$ gcc -m32 -o time32 -g3 -Wall -O0  time.c
$ ./time32
PID=5426
glibc clock_gettime-long int             tv_sec=1452509515   tv_nsec=540033119    ret=0
Assemble=>i386 int 0x80-timespec-32bit   tv_sec=1452509515   tv_nsec=540054759    ret=0
Assemble=>i386 int 0x80-timespec-64bit   tv_sec=2319584530896488779 tv_nsec=0            ret=0
カーネル挙動を確認する
当然といえば、当然の結果ですが。。。
念のための裏付けで、カーネル内部で32bitのシステムコールが呼ばれた場合どのような挙動をするのかを、ftraceでカーネル内部でどの様な関数が呼びだされているか確認してみました。
ftrace(trace-cmd)での確認方法
以下のコマンドでカーネルトレースを取得します。最後の実行コマンドをそれぞれ"./time64"、"./time32"とすることで32/64bit両環境のトレースを取得します。
$ sudo trace-cmd record -p function_graph -g SyS_clock_gettime -g compat_SyS_clock_gettime ./time64
$ trace-cmd report
trace-cmdコマンドの詳細は(ftrace)trace-cmdでfunction_graphを使ってみる - のぴぴのメモを参照。
トレース結果
64bitと32bitを比較すると、32bitアプリから呼びだした場合は、cpmpat_sys_clock_gettime()なる関数でラップされているのが分かります。(blogの横幅の関係で、関数部分のみ記載しています)。なおカーネルは、ubuntu 14.04の"Linux version 3.19.0-43-generic (buildd@lgw01-16)"になります。
64bitアプリからのカーネルトレース(抜粋)
 |  sys_clock_gettime() {
 |    posix_clock_realtime_get() {
 |      getnstimeofday64() {
 |        __getnstimeofday64() {
 |          read_hpet();
 |        }
 |      }
 |    }
 |  }
32bitアプリからのカーネルトレース(抜粋)
 |  compat_sys_clock_gettime() {
 |    sys_clock_gettime() {
 |      posix_clock_realtime_get() {
 |        getnstimeofday64() {
 |          __getnstimeofday64() {
 |            read_hpet();
 |          }
 |        }
 |      }
 |    }
 |    compat_put_timespec() {
 |      __compat_put_timespec();
 |    }
 |  }
では、compat_sys_clock_gettime()ではどんな事をしているのでしょうか。
- compat_sys_clock_gettime()は、/kernel/compat.cに実装
- まず、sys_clock_gettime()を呼び出し(この時はtimespecは64bit。下記コードでts)
- その後、copmpat_put_timespec()で、システムコールの引数に渡すデータを、カーネル空間からユーザ空間の所定位置にコピーする。(下記コードでtp)
- で、そのcopmpat_put_timespec()内部で、64bitから32bitにデータを落としているらしい。
 740 long compat_sys_clock_gettime(clockid_t which_clock,
 741                 struct compat_timespec __user *tp)
 742 {
 743         long err;
 744         mm_segment_t oldfs;
 745         struct timespec ts;
 746
 747         oldfs = get_fs();
 748         set_fs(KERNEL_DS);
 749         err = sys_clock_gettime(which_clock,
 750                                 (struct timespec __user *) &ts);
 751         set_fs(oldfs);
 752         if (!err && put_compat_timespec(&ts, tp))
 753                 return -EFAULT;
 754         return err;
 755 }
実際にデータ変換(64bit->32bit)をしているのはinlineアセンブラっぽい
- arch/x86/include/asm/uaccess.h
 411 #define __put_user_asm(x, addr, err, itype, rtype, ltype, errret)       \
 412         asm volatile(ASM_STAC "\n"                                      \
 413                      "1:        mov"itype" %"rtype"1,%2\n"              \
 414                      "2: " ASM_CLAC "\n"                                \
 415                      ".section .fixup,\"ax\"\n"                         \
 416                      "3:        mov %3,%0\n"                            \
 417                      "  jmp 2b\n"                                       \
 418                      ".previous\n"                                      \
 419                      _ASM_EXTABLE(1b, 3b)                               \
 420                      : "=r"(err)                                        \
 421                      : ltype(x), "m" (__m(addr)), "i" (errret), "0" (err))
ということで、カーネル内部のcpmpat_XXXXXXX関数で、32bitアプリ向けに64bit→32bitのデータ変換が行われているため、どうやっても32bitアプリでカーネルから64bitの時刻データを取得するのは難しそうです。
(linux)x86(32bit)でアセンブラでシステムコールを呼び出す方法。
はじめに
標準Cライブラリ(Linuxではglibc)に頼らず、システムコールを呼びして見たいなとの思いから、勉強がてらアセンブラでシステムコールを呼びだす方法をまとめてみました。
アセンブラでシステムコールを呼びだす方法
まとめると、以下の通りです。
- eaxレジスタに呼び出したいシステムコールの番号を登録する。
- システムコールに指定する番号は、"/usr/include/asm/unistd.hを参照。
- asm/unistd.hから、
- 32bitコンパイル時はasm/unistd_32.hが取り込まれる。(今回はこちら)
- (参考までに)、64bit時は、asm/unistd_64.hが取り込まれる。
- asm/unistd.hから、
- システムコールに渡す引数は順番に、ebx, ecx, edxレジスタにコピーする。
- "int 0x80"で0x80割り込みを発生させることで、システムコールを発行する。
- リターンコードは、exaに格納されるので、そのレジスターをmovでコピーする。
サンプルコードです。
#include <stdio.h>
#include <stdlib.h>
#include <sys/types.h>
#include <unistd.h>

int main()
{
	pid_t pid;

	/* call by assembly language */
	pid=0;
	__asm__("mov $20,  %%eax;"  //"$20"がgetpidのシステムコール番号
		"int $0x80;"        //80番で割り込みを発生させる
                "mov %%eax, %0;"    //返り値をpid変数にコピー
		:"=r"(pid)
	);
	printf("assembly: pid=%d\n",pid);

	/* call by glibc getpid function */
	pid=0;
	pid=getpid();
	printf("glibc   : pid=%d\n",pid);

	return(EXIT_SUCCESS);
}
実行結果です。
$ gcc -m32 -o test syscall_test.c
$ ./test
assembly: pid=3970
glibc   : pid=3970